Wellness Minneapolis
  • Home
  • Appointments
  • Dr. Barrett
    • About Dr. Barrett
    • Naturopathic Medicine
    • Mentoring
    • Dr. Barrett's Blog
  • Dr. Aidanne
  • Jesse Haas, CNS, LN
  • Resources
    • Blog
    • Recipe Box
    • Book List
  • Newsletter Signup
  • About
    • Forms
    • Testimonials
    • FAQs >
      • Charm FAQ
  • Contact
  • Shop

Coconut Cacao Granola

10/1/2020

1 Comment

 
From the kitchen of Jesse Haas, CNS, LN
Picture

I love learning about the health benefits of foods I love, like chocolate, almost as much as I love sharing that good news with my clients. Many people come to see a nutritionist prepared to be told they have to stop eating all the things they enjoy and learn to love kale...or else. I like to focus instead on bringing in more of the foods that have a functional purpose for bringing more balance and wellness. If we need to eliminate a food or food group, coming at it from "eat more X" is a much more encouraging focus than "stop eating Y." 

Cacao, the raw ingredient that is transformed into chocolate, is a valued food in functional nutrition. Full of a class of polyphenols called flavonols, cacao has major cardiovascular benefits. This potent antioxidant nutrient keeps our capillaries, veins and arteries flexible and toned. Cacao also contains a molecule called anadamide that bring us some bliss - who doesn't need more of that these days? 

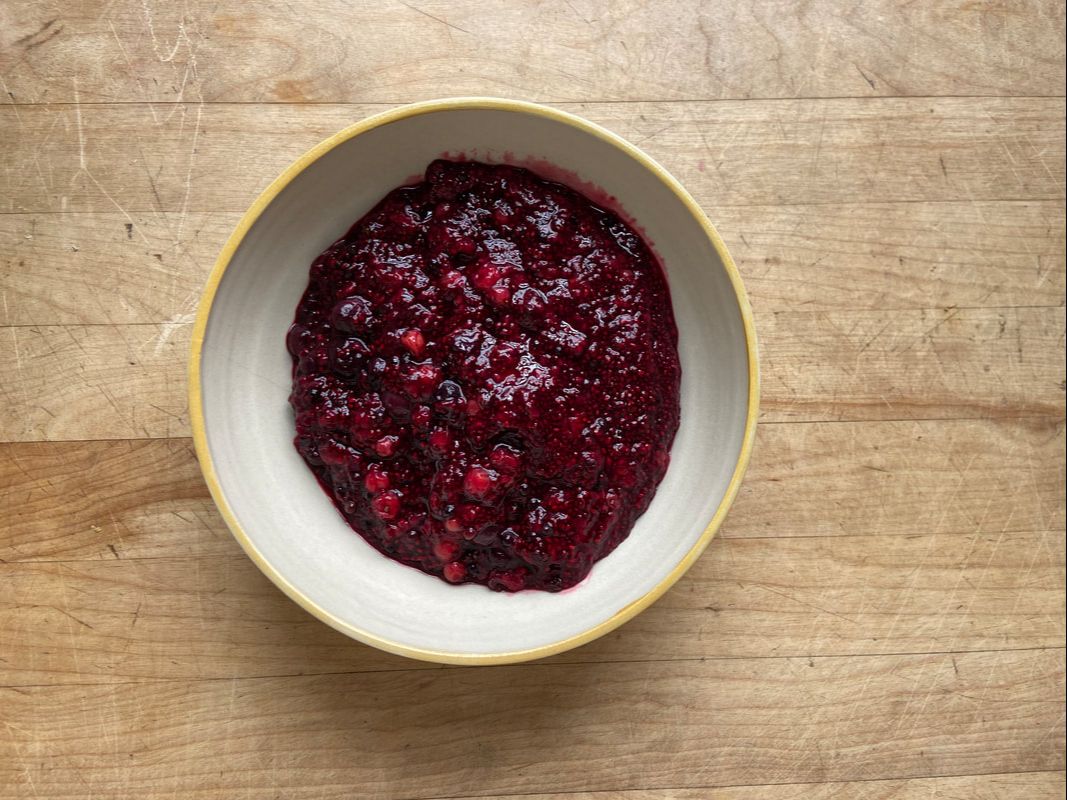
Chocolate granola may seem wholly indulgent - which is great! - but really, it's a powerful way to start the day. Serve with some non-dairy yogurt and Mixed Berry Chia Compote. This recipe is a nutritious breakfast and a great pre-workout snack. Enjoy!


Makes 8 cups or 16 1/2-cup servings

Ingredients
  • 3 cups gluten-free rolled oats
  • 3 cups nuts*
  • 1/2 cup flaked coconut (unsweetened)
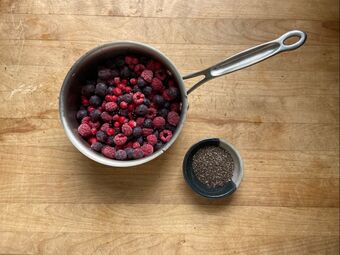
  • 4 Tbsp chia seeds
  • 1 tsp salt
  • 1/3 cup cacao powder or unsweetened baking cocoa
  • 1/3 cup maple syrup
  • 1/2 cup melted virgin coconut oil**

Directions
  1. Preheat the oven to 350 degrees F. 
  2. Measure out your nuts into a food processor. Pulse 5-10 times to chop coarsely into a desired texture and size. 
  3. In a large mixing bowl, mix together oats, chopped nuts, coconut, chia seeds, salt and cacao powder. 
  4. In a separate bowl, mix together maple syrup and melted coconut oil. Pour over the oat mixture and stir well to combine. 
  5. Spread the mixture out evenly onto 2 cookie sheets. You want a thin layer for even toasting. Bake for approximately 20 minutes, stirring every 5 minutes to prevent burning on the edges. 
  6. Remove from the oven and cool completely before transferring to an air-tight container. This granola will keep for several weeks.


*The granola pictured here contains 1 cup each of almonds, hazelnuts and cashews. Use any mixture of nuts you like!
​
**Pro Tip: I measure out my coconut oil and put it into the oven to melt while the oven preheats and I get the rest of my ingredients mixed together. 

Picture
Jesse Haas, CNS, LN is a licensed functional nutritionist and certified health coach. She was a founding partner of Wellness Minneapolis and was an active practitioner with the clinic from 2014-2022. To connect with her regarding functional nutrition and health coaching services, please follow this link.
1 Comment

Mixed Berry Chia Compote

9/21/2020

0 Comments

 
From the kitchen of Jesse Haas, CNS, LN
Picture
Picture
This recipe is more of a formula that can be used interchangeably with whatever fruit is in season or in your freezer. It has become a delicious addition to our recipe rotation at home. I love to spoon it onto yogurt and homemade granola, use in place of jam on gluten-free toast...or indulge my elevensies cravings with spoonfuls right into my mouth. 

The variation pictured here includes berries from my backyard garden: red raspberries, red currants, black elderberries, and blueberries we harvested at White Pine Berry Farm in River Falls, WI. Eating a half-cup serving of berries is part of my personal wellness plan. I think of them as delicious medicine: they are nutrition powerhouses with gifts for every system in the body. 

This compote is unsweetened and uses chia seeds to thicken it into a jam-like consistency. Enjoy! 

Print the recipe here.
​

Makes 2 cups

Ingredients: 
  • 3 cups frozen berries
  • 3 Tbsp chia seeds

Directions: 
  1. Measure your berries out into a small saucepan. You can use a mixture or choose just one kind. I like incorporating berries of different colors, shapes and sizes for a visually-pleasing compote. 
  2. Heat the berries on medium-low on your stovetop until they bubble and burst. Stir occasionally to prevent burning. 
  3. Remove from heat and stir in the chia seeds. The chia seeds will absorb excess liquid and thicken the mixture as it cools. 
  4. When the compote has cooled to room temperature, transfer to a glass container and store in the refrigerator for up to one week (if it lasts that long!). 


Picture
Jesse Haas, CNS, LN is a licensed functional nutritionist and certified health coach. She was a founding partner of Wellness Minneapolis and was an active practitioner with the clinic from 2014-2022. To connect with her regarding functional nutrition and health coaching services, please follow this link.
0 Comments

Buckwheat and Burdock Root Pilaf

5/25/2020

0 Comments

 
From the kitchen of Vanashree Belgamwar, BAMS
Picture
Burdock root is one of the most nutrient-rich foods, yet very underutilized. It's very hard to find recipes that use burdock root and it's not easily found at grocery stores. If you can get your hands on this rich root, I would urge everyone to use it!

Ayurveda mentions the qualities of burdock root as dry, sweet, bitter and astringent hence it aggravates Vata but is pacifying for Pitta (Fire + Water) and Kapha (Water + Earth) doshas. It is a very healthy carbohydrate to consume during spring and supports the urinary system, liver and gallbladder.

Widely used in Ayurveda, burdock can detox the body and balance the natural aggravation of Kapha that occurs during spring. I like to use Burdock root in many Ayurvedic recipes like kitchari, upma, various soups or replace it in recipes for roots like potato, taro root or sweet potato in other dishes I make.

Mentioned below is one such recipe that I usually enjoy during the springtime to support my Kapha energies. The pilaf is delicious and a quick, easy meal. Try it as a replacement to oatmeal as a warm, savory breakfast.

Buckwheat and Burdock Root Pilaf
Makes 4 servings
​
Download a printable recipe here.

​Ingredients:
  • 1 tablespoon sunflower oil
  • 1⁄2 cup thinly sliced burdock root
  • 1 chopped yellow onion
  • 1 garlic clove, minced
  • 1/2 tsp grated ginger
  • 1 cup diced shiitake mushrooms
  • 2 cups vegetable stock or water
  • 1 cup toasted buckwheat groats
  • 1 roma tomato, diced
  • 1/4 tsp cumin powder
  • 1/4 tsp turmeric
  • Sea salt and freshly ground pepper, to taste
  • Cilantro or parsley sprigs for garnish

Directions:
  1. Heat the oil in a sauté pan over medium heat.
  2. When warm, add and sauté the burdock for about 5 minutes, or until it is translucent.
  3. Add and sauté onions, ginger and garlic for about 10 minutes, or until they are well browned.
  4. Add turmeric, cumin powder and salt.
  5. Add the mushrooms. Sauté for 5 minutes, or until the mushrooms have exuded most of their liquid.
  6. Add the stock, and bring to a boil. Slowly pour in buckwheat groats to prevent the water from sputtering, and add tomatoes.
  7. Season with salt and pepper, to taste.
  8. Return the mixture to a boil. Then lower the heat to a simmer. Simmer 10 minutes, or until the buckwheat is cooked and the liquid absorbed.
  9. Remove from heat and allow to steam for 10 minutes.
  10. Fluff with a fork, place in a serving bowl, garnish with chopped cilantro or parsley, and serve warm.
0 Comments

Savory Oatmeal Bowl

12/9/2019

0 Comments

 
From the kitchen of Lynn Salmon-Easter, Reiki Master
Picture
When I think of oatmeal it is usually paired with nuts, dried fruit and possibly a pat of butter. I am a fan of nutrient dense meals, so vegetables are a standard at my morning meal. My spouse blew my mind when they discovered and began creating beautiful savory oatmeal bowls for breakfast each morning. There is so much versatility to these bowls that you can eat them every day and not tire.
 
Savory Oatmeal Bowl
Makes 1 serving
 
Ingredients:
  • 1/2 cup oatmeal cooked (preferably rolled oats or steel cut oats)
  • 2 eggs cooked any style
  • 1-2 Tablespoons butter
  • 1-2 strips of bacon or 1-2 sausage patties or links
  • 1/2 -1 cup of vegetables or toppings of your choice. Anything goes, but here are a few suggestions: scallions, garlic, green beans, spinach, green or red peppers
  • Salt and pepper to taste
 
Directions:
  1. Cook oatmeal as directed on the package. If you plan to eat several savory bowls in a week, cook a generous amount of oatmeal and reheat when needed.
  2. Add 1 T. butter to oatmeal after cooked
  3. Cook or reheat bacon and/or sausage
  4. Cook your eggs any style you prefer in the bacon or sausage drippings
  5. Sauté veggies in 1 T. of butter or use leftover vegetables from a previous meal and reheat
 
Optional:
  • Add some fresh or dried herbs of your liking
  • Choose a  culinary theme and get creative like a Mexican savory oatmeal bowl: oatmeal, eggs, sausage, black beans, salsa and cilantro. Yum!!

Click here for a printable recipe. 

0 Comments

For Sardine Lovers Only . . . A Recipe For Any Meal

8/5/2019

0 Comments

 
From the Kitchen of Amy Daws, CMT, CST
Picture
This is one of my favorite go-to recipes when I need a quick breakfast, lunch or dinner. It’s great lighter meal for the summer that packs in the protein and vegetables. Plus who doesn’t love sardines?! 

 Ingredients
  • 1 cup black quinoa
  • 1-2 heads of broccoli
  • ¼ cup onion, sliced
  • ½ red pepper, sliced
  • 2 large handfuls of spinach
  • 1 14-oz can of artichoke hearts, drained
  • 2 4-oz cans of sardines, drained
  • 2 cloves of garlic, minced
  • Salt and pepper to taste
  • 2 tsp high heat oil, like avocado oil
  • olive oil, to taste
 
Directions
  1. In a small saucepan, cook quinoa by bringing it to boil in 2 cups of water. After it starts boiling, reduce heat to low and cover. Simmer 15-20 minute or until water is absorbed.
  2. While the quinoa is cooking, heat oil in a sauté pan over medium heat. Add broccoli, red peppers and onion to hot oil.
  3. When vegetables are almost fully cooked, add garlic and let cook until you smell the garlic. 
  4. Turn down heat and add artichoke hearts, sardines and spinach. Let cook until spinach is wilted and all ingredients are heated, about 1-2 minutes.
  5. Add cooked quinoa to vegetable/sardine mixture. Season with salt and pepper to taste.
  6. Serve warm drizzled with a small amount of olive oil.

For a printable PDF of the recipe, click here

0 Comments

Un-deviled Eggs aka Lazy Devils

6/3/2019

0 Comments

 
From the kitchen of Lynn Salmon-Easter
Picture
Adapted from the kitchen of: Michelle Tam + Henry Fong and their cookbook Nom Nom Paleo: Food for Humans

I love eggs!  They are so versatile!! I enjoy deviled eggs, but I am not a fan of all the fuss it takes to make them. When I hit the summer potluck and party circuit, I like to turn to Michelle Tam’s lazy devils for food that is fun, fast and nourishing too. This recipe for un-deviled eggs (aka lazy devils) fits the bill. You can make the recipe with a plan in mind or just boil up some eggs and see what toppings you have in your fridge.
 
Ingredients
  • 12 large eggs, preferably ones that are at least one week old
  • 6-8 cups water
  • 1 teaspoon baking soda
 
Directions
  1. Gently place eggs in a wide saucepan in single layer and add the water and the baking soda. (The sodium bicarbonate will help the eggs separate from their shells, making them easier to peel.) Make sure the eggs are at least 1 inch below the surface of the water.
  2. Put the saucepan on the stove, and crank the heat to high. As soon as the water comes to a boil, set a timer for 1 minute. When the minute is up, take the pot off the heat, cover with a lid, and let the eggs sit in the hot water for 10 minutes. Don’t forget to set a timer!
  3. In the meantime, fill a large bowl with water and ice. Once the timer goes off, transfer the eggs to the ice water and submerge for 5 minutes.
  4. Then take the eggs out of the icy water, gently tap them against a hard surface to crack shells and peel each egg.
  5. Hopefully, you have perfectly cooked eggs. If you aren’t eating the eggs right away, store                  them in the fridge in a sealed container. They will keep for up to a week.
  6. When you are ready to make your un-deviled eggs, cut each egg in half lengthwise and dress with your favorite toppings below.
 
Toppings for un-deviled eggs (aka lazy devils):
 
The sky is the limit friends! Let your imagination run wild!! Below are some tried and true ideas I have used.
 
Guidelines for successful un-deviled eggs:
  • Use a creamy sauce to help toppings stay on top of the egg
  • Toothpicks are functional and pretty for this party fare

BLT: mayo, tomato, lettuce, bacon
 
Salmon Surprise: mayo or guacamole, cucumber, cooked salmon with garlic and dill
 
Mediterranean: hummus, roasted red pepper, basil, kalamata olive
 
Here are the eggs featured by Michelle Tam + Henry Fong in their cookbook Nom Nom Paleo: Food for Humans (all items listed in Michelle’s toppings can be made from her cookbook)
 
Classy Devil: ranch dressing (paleo), bacon, greens, tomato
 
Island Devil: mayo (paleo), slow cooker (Kalua) pork, pineapple, cilantro and sea salt
 
Lazy Devil: sriracha mayo (paleo), prosciutto, chives, sea salt
 
Crabby Devil: holy moly guacamole, crab, apple and lime juice, freshly ground pepper

For printable PDF of recipe, click here
0 Comments

Oatmeal Cookie Stress Soother

5/29/2019

0 Comments

 
From the kitchens of Jesse Haas, CNS, LN and Amber Hanson, LN
Picture
These cookie bites are sure to please every member of your household. They’re reminiscent of oatmeal cookies with a little extra nutrition and a little less effort.

Makes 15

Ingredients
  • ¼ c raisins, soaked for 20 minutes
  • 1 ¼ c rolled oats
  • ½ c unsweetened almond butter
  • 2 Tbsp freshly ground flaxseed
  • 2 Tbsp or more water
  • 1 tsp cinnamon
  • ½ tsp vanilla extract
  • ¼ tsp salt

Directions
1. Line a cookie sheet with parchment or wax paper.

2. Pulse raisins with ¼ cup oats and flaxseed in a food processor approximately 10 times, or until coarsely chopped. Add water, a tablespoon at a time, until you get a thick mixture.

3. Mix the raisin mixture with the remaining ingredients.

4. Squeeze and roll the mixture into balls and place on the parchment paper-lined cookie sheet.

5. Refrigerate until firm. Store in a sealable container for up to 2 weeks. 


Jesse Haas, a white, cis-female with brown hair and dark glasses. She’s wearing a bright green sweater.
Jesse Haas, CNS, LN is a licensed functional nutritionist and certified health coach. She was a founding partner of Wellness Minneapolis and was an active practitioner with the clinic from 2014-2022. To connect with her regarding functional nutrition and health coaching services, please follow this link.

0 Comments

Balanced Berry Smoothie

5/29/2019

0 Comments

 
From the kitchen of Amber Hanson, LN
Picture
Smoothies can be a great on-the-go meal or snack option but so often they are loaded with lots of fruit and light on fat and protein which can lead to swings in blood sugar levels.  This version keeps everything in balance and manages to sneak in some vegetables too (I promise, you won’t even be able to tell!)
 
Makes 1
 
Ingredients
  • ½ cup frozen mixed berries
  • ½-1 cup frozen cauliflower rice
  • ¼ cup full fat canned coconut milk
  • 2 scoops protein powder
  • Water or alternative milk to get desired consistency
 
 Directions
  1. Place all ingredients in a blender; blend until smooth.
 
Tip: For extra fiber try blending in a tablespoon of chia, hemp or flax seeds!

For a printable PDF, click here
0 Comments

Cast Iron Skillet Baked Pancake

2/19/2018

0 Comments

 
From the kitchen of Bri Dunbar, LAMFT
Picture
Here's a spin off the ole traditional pancake. Top with fresh fruit or maple syrup.

Ingredients:
  • 2 eggs
  • 1/2 cup milk or non-dairy beverage
  • 1/2 cup flour or gluten-free all purpose flour
  • 1/4 tsp salt
  • 3 Tbsp butter, ghee or coconut oil
  • fruit or maple syrup, to taste

Directions:
  1. Preheat oven to 425 and place 10" cast iron skillet in the oven to warm.
  2. Meanwhile, beat eggs, milk, flour and salt in a bowl.
  3. When the oven is ready, remove the skillet. Add butter and swirl to coat the bottom evenly. 
  4. Add batter and top with desired fruit. 
  5. Return to the oven and bake 20 minutes. 
0 Comments

​BABY’S FIRST GREEN SMOOTHIE

6/19/2017

0 Comments

 
From the kitchen of Dr. Lori Hulsing
 
Green smoothies are a great way to supply children with variety of nutritious fruits and vegetables. In addition, when green smoothies are introduced to children as babies, they are generally more accepting of the different flavors, colors, and textures of this healthy drink than if they are introduced later.
 
You can start giving green smoothies at 8+ months of age. Start with small quantities to make sure your baby can digest the smoothie well. In addition, make sure you include only one new food at a time in the smoothie so you know what the culprit is if your child has a reaction to that item.
 
If your baby or toddler isn’t interested in a green smoothie with the first introduction, just try again at a later date. Studies suggest that young children may need to be exposed to a novel food many times before they like it. Children will likely be more interested in trying this type of food too if they see parents, caregivers, and siblings eating green smoothies.
 
This recipe feeds my two bambinos and I and was described as "delicious" by my discriminating 7 year old while my 13 month old squealed in delight: success! ​
Picture
Ingredients:
  • 2 lacinato kale leaves
  • 1/2 avocado
  • 1/2 cup blueberries
  • 1 banana
  • 1/4 inch peeled ginger (Do not add too much ginger or it will overpower the smoothie)
  • 1/4 cup applesauce (This ingredient is optional. For older babies you can replace this with 1/2 an apple or pear instead)
  • 2 cups water
 
Directions:
  1. Blend all ingredients in a high powered blender until completely smooth. 
  2. Do not add sweeteners to the smoothie. Children are developing their food preferences and can get accustomed to artificially sweetened foods which can be detrimental to their health. If you choose to add a sweetener--no honey before age one. 
  3. You can feed the smoothie to your child with a spoon or in a glass.
  4. Leftovers can be stored in the fridge for later. Adding a little lemon juice will keep the smoothie fresh even longer. 

Click here for a printable recipe.
0 Comments
<<Previous

    Recipes

    Every time you eat is an opportunity to nourish your body. Find our recipes on Pinterest!

    Get recipes delivered to your inbox monthly! Sign up for our newsletter.
    Sign up

    Recipe Box

    All
    Breakfast
    Dairy Free
    Drinks
    Fall
    Gluten Free
    Main Course
    Side Dish
    Spring
    Summer
    Treats
    Vegetables
    Winter

    RSS Feed

Contact Us • Newsletter Signup
Phone: (612) 598-8627
Fax: (833) 792-0900
Find us on Instagram @wellnessmpls
Thank you to Emma Freeman for many of the photos on this site.
© Wellness Minneapolis | All rights reserved