Wellness Minneapolis
  • Home
  • Appointments
  • Workshops
  • Dr. Barrett
    • About Dr. Barrett
    • Naturopathic Medicine
    • Mentoring
    • Dr. Barrett's Blog
  • Jesse Haas
    • About Jesse
    • Functional Nutrition
    • Massage
    • Jesse's Blog
  • Practitioners
    • Acupuncture with Jules Dirsa, LAc
    • Ayurveda with Vanashree Belgamwar, BAMS
    • Chiropractic Care with Dr. Jillian
    • Massage + Bodywork with Amy Daws, CMT, CST
    • Naturopathic Medicine + Acupuncture with Dr. Hamilton
    • Naturopathic Medicine with Dr. Jones
    • Naturopathic Medicine with Dr. Stamer
    • Physical Therapy with Dr. Rita White
    • Reiki with Lynn Salmon-Easter
  • Resources
    • Blog
    • Recipe Box
    • Partners
    • Book List
  • Newsletter Signup
  • About
    • Join Our Team
    • Art Heals Residency
    • Forms
    • Testimonials
    • FAQs >
      • Charm FAQ
  • Contact
  • Shop

Red Cabbage with Apples

9/14/2020

0 Comments

 
From the kitchen of Lynn Salmon-Easter, Reiki Master
Adapted from Deborah Madison’s recipe in ‘Vegetarian Cooking for Everyone’
Picture
This is a delicious way to eat cabbage in the fall and winter months. 

Click here for a printable version of this recipe. 


Ingredients:
  • 3 Tbsp of olive oil
  • 1 small onion, finely diced
  • 1 Tbsp caraway seeds
  • 1 medium red cabbage, about 2 pounds, quartered, cored, and finely sliced
  • 2 Granny Smith apples quartered, cored, and diced or shredded
  • Salt and freshly ground pepper
  • Apple cider vinegar 


Directions:
  1. Heat the oil in a large skillet.
  2. Add the onion and caraway, give them a stir, then cook for a few minutes over medium heat until the onion is translucent.
  3. Add the cabbage and apples and season with 1 teaspoon salt.
  4. Cover tightly and cook very slowly until the cabbage is meltingly tender, up to an hour.
  5. Taste for salt, season with pepper, and toss with vinegar, to taste. 

Picture

​Lynn is a highly intuitive, empathic and creative person. She creates a Reiki session that is uniquely yours. She uses her skills as a Reiki Master and her knowledge in Healing Touch and works with you to balance, harmonize and clear your energy by following your body’s unique energetic needs. She  has been exploring and deepening her own understanding of self-care and wellness and believes self-care is a form of self-love. She has learned from her own journey that when she comes back to self-care and love again and again — she returns to her true and essential nature of non-judgment, joy and peace. She would like to help others to do the same as she feels called to be a practitioner and to spread love!
0 Comments

Fresh Fennel Salad

8/17/2020

0 Comments

 
From the kitchen of Amy Daws, CMT
Picture

The fennel in this salad really makes it pop and it's super easy to make. A great way to enjoy summer vegetables from your CSA or home garden.  Download a printable recipe here. 

Download this link for a printable version of this recipe. 

Makes 4-6 servings

Ingredients
  • 1 fennel bulb with fronds
  • 1 corn cob, grilled or boiled
  • 1/2 pint cherry tomatoes
  • 1/2 onion
  • 1 cucumber
  • 2 Tbsp. lemon juice
  • olive oil
  • salt and pepper
  • feta (optional)

Directions
  1. Remove fennel fronds from stalk and coarsely chop
  2. Shave fennel paper thin 
  3. Cut corn off the cob
  4. Quarter tomatoes
  5. Cut onion into very thin slices
  6. Halve cucumber lengthwise and cut into thin slices 
  7. Combine all vegetables into a bowl
  8. Add lemon juice and drizzle with olive oil and salt and pepper to taste.
  9. Add chopped fennel fronds and feta (optional)

Picture
As a bodyworker trained in Therapeutic Massage and Shiatsu, sessions with Amy focus on addressing your immediate concerns as well as the root cause. She takes the time to listen to your concerns and all aspects of your health. Her work is gentle, but deep to unwind patterns that have been held in the body. Sessions together may include assisted stretching, self-care suggestions and aromatherapy. Her work in conjunction with increased body awareness will give you the tools to curb off future pain and stress. Amy has been practicing bodywork since 2015. For more information about Amy's practice, visit her professional website. ​
0 Comments

Kinpira Gobo - Spicy Burdock Root Sauté

5/8/2020

0 Comments

 
From the kitchen of Jesse Haas, CNS, LN and adapted from one of her favorite cookbooks, Asparagus to Zucchini: A Guide to Cooking Farm-Fresh Seasonal Produce
Picture
Burdock root is an invasive “weed” brought to the U.S. by Chinese immigrants. It grows very well in the Midwest and can be harvested early in the spring before much else has had a chance to grow, making it one of the first locally grown produce items to hit the grocery stores. 

Burdock isn't common on the Midwestern menu, which is really too bad, in my opinion! It's nutty flavor and crunchy texture makes it really fun to eat. You can add it to stir-fries, potroast and roast it in the oven with other root veggies. Pickled burdock is one of my favorite sushi ingredients. 

Burdock has some special nutritional benefits, as well. It stimulates the production and secretion of bile from the gallbladder, thereby supporting digestive function and our body’s natural detoxification processes that are especially beneficial when added to a spring cleanse. 

Burdock is also a source of fructooligosaccharides (aka FOS), a prebiotic compound that supports an ecosystem of beneficial bacteria in the colon. FOS has gotten a bad reputation by the low FODMAP diet, but is actually an incredibly beneficial compound for people who can digest it. FOS is also found in garlic, onions, asparagus, globe and Jerusalem artichokes, chicory and dandelion roots. 

You’ll most likely find burdock at Asian groceries, though you may also find it in the spring at your local grocery co-op or farmers market. Kinpira gobo is a Japanese dish that I always look forward to eating in the spring. Serve as a side dish or add tofu or chicken and serve over rice for a complete meal. 

Makes 4 side dish servings or 2 entrée servings
​
Download a printable recipe here. 


Ingredients:  
  • 2 medium burdock roots 
  • 2 medium carrots
  • 4 scallions
  • 1 Tbsp avocado or coconut oil
  • 1 tsp rice wine or apple cider vinegar
  • 1 Tbsp tamari or soy sauce
  • 1/2 tsp honey
  • ¼ tsp hot pepper flakes
  • 1 Tbsp toasted sesame oil
  • 2 tsp toasted sesame seeds (optional)
 
Method:
  1. Scrub burdock roots. Cut into 2-inch matchsticks; soak in cold water for 1 hour, changing the water once or twice.
  2. Scrub and cut carrot into matchsticks.
  3. Chop scallions. 
  4. Mix vinegar, soy sauce, and honey in a small cup.
  5. Heat oil in wok or heavy skillet. Stir-fry vegetables 2-3 minutes until al dente.
  6. Sprinkle in pepper flakes; stir-fry 30 seconds.
  7. Add sauce; stir-fry 1 minute. Remove from heat; drizzle with toasted sesame oil and sprinkle toasted sesame seeds. Enjoy warm or room temperature.

Picture
Jesse Haas is a heart-centered and deeply intuitive nutritionist. She approaches each client with a holistic perspective, taking into consideration not just the mind, body and spirit, but also life schedule, stresses and personal preferences to curate a nutrition plan that is unique to the individual. Jesse shows up as a partner in her client’s wellness, not the boss. She combines nutritional counseling with whole foods culinary education to help her clients understand why they’re not feeling well and how to change that one delicious meal at a time. Schedule a complimentary phone consultation to learn how to use food as medicine to find balance in your own life. Jesse is co-founder of Wellness Minneapolis.
0 Comments

Beet Hummus

4/6/2020

0 Comments

 
From the kitchen of Dr. Brittany Stamer
Picture
Hummus in vibrant color!

Hummus is a great way to eat more fiber, beans and vegetables alike. It can also be an amazing way to incorporate creativity into your cooking.

Regular hummus is delicious but adding in beets creates a beautiful color, adds nutrients, and is a delicious new flavor to try. Beets are known to be supportive to liver health and detoxification, high in antioxidants, and have benefits to cardiovascular health. 

Download the recipe here in a printable pdf. 

Ingredients:  
  • 1 1/2 cup cooked chickpeas*  
  • 4 tbsp lemon + lemon zest (optional)
  • 2 tbsp tahini 
  • 4 garlic cloves 
  • 1 tsp salt + pinch of salt 
  • 4 tbsp filtered water 
  • 5 tbsp olive oil 
  • 1 cup roasted beets (about 1 medium beet)**
  • 1 tbsp avocado oil  

Directions:
  1. In your blender or food processor, add lemon, tahini, garlic cloves, salt, olive oil, filtered water, roasted beets, and chickpeas. Blend on high for a few minutes. You can add more water and/or olive oil to achieve desired consistency.
  2. Top with lemon zest and serve with veggies of your choice: cucumbers, radishes, carrots, tomatoes...whatever your veggie-loving heart desires. And enjoy!


*TO COOK CHICKPEAS: Soaking and/or pressure cooking beans helps reduce phytates (phytic acid). Phytates are anti-nutrients that can inhibit absorption of nutrients such as iron. Also, by buying chickpeas in bulk we reduce plastic waste and reduce exposure to BPA (bisphenol-A) that is in the lining of canned foods. Even BPA-free cans can have BPA substitutes in the lining such as BPS and BPF. BPA, BPS, and BPF are xenoestrogens, meaning they are estrogen mimickers in our body, which can create hormonal imbalance and lead to a variety of health issues. 
  1. Measure out 3/4 cup dry chickpeas into a large bowl. Cover with water and soak on your countertop overnight (8-12 hours). 
  2. Strain and rinse beans. Place in a large saucepan and add 1 1/2 cup fresh water. Cover and bring to a simmer. Cook for 30-40 minutes, or until cooked. Older beans will take longer. Store in the refrigerator until ready to prepare hummus.


**TO ROAST BEETS:
  1. Preheat oven to 400 degrees.
  2. Chop 1 medium beet into 1/2-inch cubes. 
  3. Place on sheet pan with 1 tbsp avocado oil and salt and roast for 30 minutes. You can make these beets several days before making hummus. 

Picture
​Dr. Stamer earned her Doctorate of Naturopathic Medicine at National University of Natural Medicine in Portland, OR. During her doctoral training, she also earned a Certificate in Natural Childbirth. She supplemented this coursework by completing a two-year apprenticeship in midwifery, women’s health, and pediatrics with a private practice in Portland, OR. Dr. Stamer has a passion for preventative medicine, educating patients about their bodies and health, and serving the community. She seeks to help people on their healing journeys using nutrition, lifestyle counseling, botanical medicine, biotherapeutic drainage, and homeopathy.
0 Comments

Cauli-Rice Tabouli

9/9/2019

0 Comments

 
From the Kitchen of Jesse Haas, CNS, LN
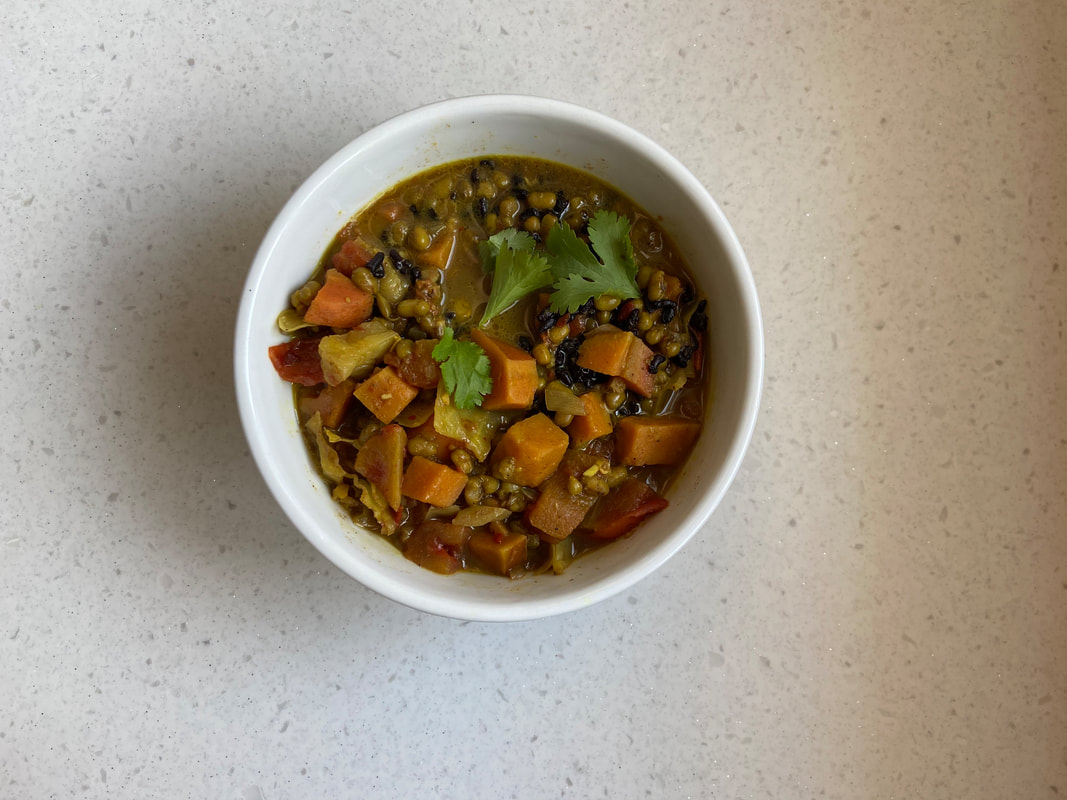
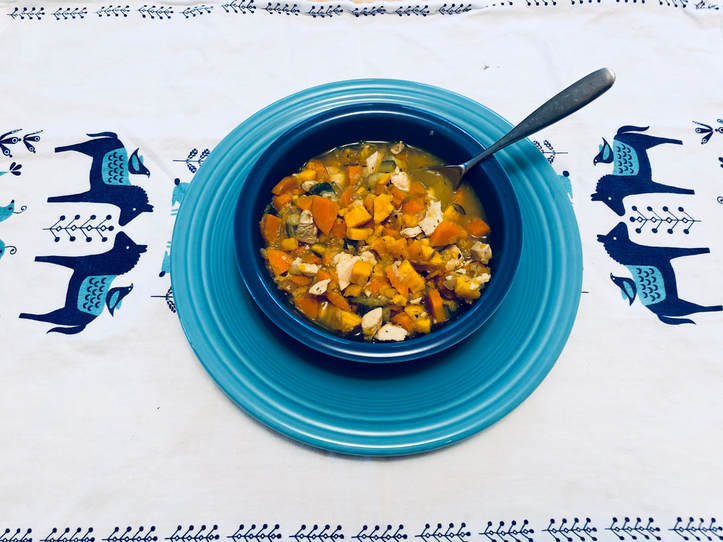
Picture
True confessions: I'm obsessed with brassicas. I’m so that obsessed I got a cabbage tattooed on my shoulder! This large plant family contains anti-cancer nutrients, nutrients that support liver detoxification AND hormone balance. I keep brassicas, like cauliflower, cabbage, kale, arugula and radishes around and plug them into any and every dish I make.

Bring on the broccoli!

If you have parsley or other fresh herbs growing in your garden, this dish is a must. It comes together in minutes and packs the veggie punch. Serve it with a protein-rich main dish, like Lentil Walnut Burgers or Dr. Barrett’s Kale Burgers, and you have yourself a meal.

Cauli-Rice Talouli
Makes 4-6 servings

Ingredients:
  • 1 12-oz bag frozen cauliflower rice
  • 1 medium cucumber, peeled (if you must) and chopped small
  • 1 pint cherry tomatoes, quartered
  • 1/2 cup finely chopped Italian parsley
  • 2 Tbsp chopped chives
  • 1 Tbsp extra virgin olive oil
  • 2 tsp white balsamic vinegar
  • salt and pepper, to taste

Directions:
 1. Mix all the ingredients together and try to wait until you sit down to dinner to eat it. ⁠⠀

Optional:
  • Add more herbs! Fresh basil and oregano taste great with these veggies. ⁠⠀
  • Add more veggies! Arugula and nasturtium greens bring a little bite and more color to an already beautiful dish.

Picture
Jesse Haas is a heart-centered and deeply intuitive nutritionist, with a strong background in health sciences  and a stronger  commitment to solving the intricate puzzles of her  clients health  concerns. She combines nutritional counseling and  whole foods  education to help her clients transform their health in  small,  sustainable ways. Jesse truly believes in "teaching a (wo)man to   fish" so focuses on empowering each client with the  knowledge,   skills and focus they need to fully hold the reins on  their health.

Jesse is co-founder of Wellness Minneapolis.
0 Comments

The Dragon Bowl

4/15/2019

0 Comments

 
From the kitchen of Jules Dirsa, LAc, originally adapted from a recipe in  The Angelica Home Kitchen by Leslie McEachern.
Picture
This recipe is healthy comfort food for me. I’ve been making it since I first learned how to cook healthy foods for myself as a young adult. I ate this on a trip to NYC at an organic vegan restaurant called “Angelica Kitchen”. I loved it and bought the cookbook while I was there so I could try to replicate it at home. It’s a basic grain and veggie bowl with a tahini based herbal dressing, which tends to be in my regular rotation of meals, but I especially appreciate it as a type of reset button if I’ve gone off the rails on eating adventures like the State Fair. I feel so good when I’m eating it. It tastes great and feels super wholesome, and helps me get in a good amount of veggies in my meal.  It’s adaptable to different veggies and grains. I try to switch up which veggies I pile onto the dragon bowl to include as much of the rainbow of veggies and mushrooms as possible, or whichever ones have been lacking from my recent meals. When I have access to good quality seaweed I stock up to have it on hand for this meal - especially my favorite, Pacific Sea Palm. I also experiment with different grains, but my favorites tend to be forbidden black rice and tried-and-true short grain brown rice. Any leftover dressing I tend to use on breakfast veggies with eggs on top, which gets me off to a good start. 
 
Ingredients:
The “Dragon Bowl”:  choose your favorites, as few or as many as you want
  • 1 bunch of steamed greens (ex: collard greens, mustard greens, kale, swiss chard, or bok choy)
  • 1 cup rice or other grains 
  • 1 cup beans or tofu  (adzuki beans or garbanzo beans, etc)
  • 4 cups root vegetables or seasonal steamed vegetables (ex: carrots, beets, summer squash, rutabega, parnsip, or zucchini)
  • 1 oz. or 1 cup sea vegetables  (arame, sea palm, or hijiki, etc)
 
*optional for cooking with sea veggies:
  • 2 Tbsp. tamari or shoyu
  • 1/3 cup julienned carrots
  • 1/3 cup of onion sliced into thin crescents
  • 4 cups of water
 
“Angelica House Dressing”:
  • 1/2 cup firmly packed fresh parsley, washed, dried, and chopped
  • 1 whole scallion / green onion, rinsed and sliced
  • 1/4 cup tahini
  • 1 tablespoon umeboshi paste
  • 1/2 cup of water
 
Directions:
  1. Prepare the rice and protein of choice, steam the greens and veggies.
  2. If using sea veggies: Soak for 30 minutes, then simmer in water for 25 minutes with julienned carrots, onion, and tamari.  
  3. Assemble the bowl by layering each component into a colorful pile.
  4. Combine all the ingredients for the dressing in a blender and puree until smooth. 
  5.  Pour dressing on top of assembled dragon bowl. 
 
 For a printable PDF, Click Here
Picture
Jules Dirsa is a licensed acupuncturist with many years of experience in both individual and community acupuncture. He is dedicated to the healing process of each of his clients, and meets with each client where they are at in an open-hearted and non-judgmental way. He utilizes gentle, effective treatments which pull from the tools of Traditional Chinese Medicine (acupuncture, herbs, cupping) in order to help each client unlock the healing potential within themselves. Jules strongly believes you can feel healthy at any age, any size, any phase of life.
0 Comments

Pumpkin and Ancho Chile Soup

11/19/2018

0 Comments

 
From the kitchen of Amy Daws, CMT
Picture

This is one for my favorite fall recipes. Pumpkin soup is a treat, but pumpkin soup with ancho chilies is on a whole other level! Anchos are not super spicy and are often described as earthy, smoky and sweet. In this soup they add a rich deep flavor with just a little spice that makes it extra super special.
 
Ingredients:
  1. 1  medium pumpkin, roasted
  2. 3 dried ancho chilies
  3. 2 celery stalks
  4. 2 medium carrots
  5. 1/2 onion
  6. vegetable stock or water
  7. 2-3 Tbsp canola or vegetable oil
  8. 2 tsp cinnamon
  9. salt and pepper to taste
 
Instructions:
  1.  Preheat oven to 350 degrees.
  2.  Cut pumpkin in half and scoop out seeds.
  3.  Lightly oil pumpkin halves and place on a baking sheet, cut side down.
  4. Roast pumpkin for  30 minutes then flip and continue roasting until soft and caramelized, let cool.
  5.  Start a small saucepan of water to boil.
  6. Cut ancho chilies and remove seeds.
  7. Toast Chiles. Start by preheating  a dry skillet over medium heat for a few minutes. Add dry chilies and press with spatula until toasted, roughly 15-25 seconds for each side.
  8. Add toasted chilies to boiling water and turn off heat. Let sit for 5-7 minutes in water, then drain. Discard water.
  9. Rough chop onions, carrots and celery and saute in stock pot at medium-high heat for 5-7 minutes.
  10. Scoop pumpkin from shell and reserve.
  11. When vegetables are slightly caramelized, add in chilies, pumpkin and vegetable stock or water to cover. Simmer for 20-30 minutes. Remove from heat.
  12. In small batches, transfer to food processor.  Puree until smooth.
  13. Season with cinnamon, salt and pepper.

Click here for a printable PDF

Picture
As a bodyworker trained in Therapeutic Massage and Shiatsu, sessions with Amy focus on addressing your immediate concerns as well as the root cause. She takes the time to listen to your concerns and all aspects of your health. Her work is gentle, but deep to unwind patterns that have been held in the body. Sessions together may include assisted stretching, self-care suggestions and aromatherapy. Her work in conjunction with increased body awareness will give you the tools to curb off future pain and stress. Amy has been practicing bodywork since 2015. For more information about Amy's practice, visit her professional website. 

0 Comments

Everything but the Kitchen Sink: Autumn Stew

10/22/2018

0 Comments

 
From the kitchen of Dr. Lori Hulsing
Picture
After the birth of my second child my cooking strategy shifted to the following:
  1.  Keep it simple.
  2. Grab whatever is in the fridge and put it into a soup or stew before it goes bad.
  3. Put in as many vegetables as possible.
 
For this recipe I focused on autumn seasonal vegetables and also what I found in my fridge! You can use whatever vegetables you have on hand but just follow the base of the recipe. This hearty stew was perfect to warm up the whole family on this beautiful chilly fall day.
 
Ingredients
  • 2 tbsp olive oil
  • 1 yellow onion, diced
  • 1-2 tsp of thyme
  • 5 gloves of garlic, crushed and minced
  • 3 med. sweet potatoes, diced
  • 3 large carrots, diced
  • 1-2 zucchini squash, diced
  • 1 (32 oz) container of chicken or vegetable broth or homemade stock
  • Optional: 2 chicken breasts, cut into pieces
  • Optional to add 1-2 cups of kale, chopped, if you found it in your fridge and it’s about to go bad. Hypothetically speaking.
  • salt and pepper to taste
 
Directions
 
    1.     Add 2 tbsp of olive oil to a large, heavy stock pot over medium heat. 
    2.     Add 1 diced onion and sauté for about 5 minutes. 
    3.     Add garlic and sauté for about 1 minute. Enjoy that smell!
    4.     Add Thyme—crush between your fingers as you add it to the pot. 
    5.     Add pieces of chicken or leave it out if you are making a vegetarian dish and sauté for 3          minutes.
    6.     Add the vegetables (sweet potato, zucchini, kale, carrots) and sauté for 5 more minutes. 
    8.     Add 32 ounces of chicken or vegetable broth and simmer for 25 minutes or until veggies are tender. Season with salt and pepper to taste if you wish.
Click here for a printable copy
0 Comments

Sunflower Kale Pesto

9/3/2018

0 Comments

 
From the kitchen of Raki Kopernik
Picture
This is a recipe I created based on the idea of tradition basil pesto. I wanted to make a healthier pesto and find a way to feed those leafy greens to my family and friends when they get sick of salads and steaming. This is also a great way to preserve large amounts of greens. I often make a few batches at the end of the garden season.
 
I’m not much of a recipe follower, but I love cookbooks and recipes for the seed (pun intended) of inspiration. I encourage you to use whatever greens and seeds or nuts you have on hand and whatever flavors you’re craving. I like to spread this on toast, sandwiches (particularly tempeh Ruebens – I’ll give you that recipe next time), add to salads, as a veggie or cracker dip, mixed in with grains, pastas, on eggs, really it can go on anything savory.
 
         Ingredients
  • 1 bunch of kale, any variety - You can also use any or a combination of collard greens, broccoli leaves, chard, beet greens, carrot tops etc. Literally any hardy greens.
  • 1/2 cup sunflower seeds - Sunflower seeds are particularly delicious to me, but you can use pine nuts, pumpkin seeds, walnuts, hazelnuts, or a combination etc. If using something less oily like almonds, soak them first for a few hours.
  •  1-2 tsp turmeric powder - This is less for the flavor and more for the health benefits. I add turmeric to everything. It’s high in anti-inflammatory and antioxidant nutrients.
  •  2-4 cloves of garlic
  •  Juice of 1 lemon or lime
  •  1/4 cup olive oil and/or coconut oil
  • Pinch of salt and pepper
  • Any other spices you like to use. I am very fond of smoked paprika

​          Instructions
  1. Loosely chop up greens and place in a food processor. Pulse or run for a few seconds.
  2. Add seed/nuts and again pulse or run for a few seconds until things start to look combined and mealy.
  3. Add the rest of the ingredients and run for about 10 seconds. Using a rubber spatula, scrape the sides of the container and run again for 5-10 second.
  4. Add more oil if it feels too thick. I like the consistency to be pasty so I can spread it, like peanut butter. It can be as chunky or as creamy and you prefer.
  5. Store pesto in a mason jar in the fridge and label it with the date. It will likely last for about 3 weeks.
  6. YUM!

​Click here for a printable version

0 Comments

Backpacking Food

8/6/2018

0 Comments

 
Authored by Dr.Sara Jean Barrett
Picture
Picture
I love backpacking. Getting deep in to the woods, miles from anyone else and being totally immersed in nature is pure bliss. One major challenge for backpacking is how do you bring nourishing food to last several days that is light and easy to bring along? An even bigger challenge is doing this on a low carb diet! I had to tackle this head on getting ready for a backpacking trip this summer. My partner and I spent many hours researching and preparing so I want to share with you what I have learned. This isn’t a typical recipe blog more of a how-to guide to plan for healthy
camping/backpacking meals.  

Breakfast:
Most backpackers rely on oatmeal for a satisfying breakfast. It is light to carry and easy to prepare. So we didn’t stray far from this classic we found Wildway Grain Free Instant Hot Cereal. We tried four of their flavors and my favorite was toasted coconut. We brought along some chia seeds and coconut oil to add to this breakfast.
Net carbs= 8g


Lunch:
In the middle of the day we were moving so we didn’t really want to sit down and eat a big meal so we broke lunch up in to two smaller meals.

Meal 1: We brought along with us some pecans and my favorite turkey jerky by Vermont Smoke and Cure. Eating ¼ cup of pecans and 2 jerky sticks each gave us enough fuel to make it to our second smaller meal.
Net carbs=  3g
 
Meal 2: We combined chocolate protein powder, fiber powder, greens powder and powdered coconut milk with water for a chocolate pick me up drink. My current favorite protein powder is NutriDyn’s Chocolate Paleo Protein.  We also use NutriDyns fruits and greens powders for an extra boost. My favorite is their espresso flavor.

Net carbs= this will depend on what fiber you use and if you choose to add a greens powder. The greens powder does increase the carb count for us this came out to 9 grams.
 
Dinner:
We rotated through 4 different dinner meals that each combined a protein + veggie pouch + seasoning + fat.
 
Let’s start with the prep work at home.

Picture
Protein:
We have a dehydrator and used that to dehydrate several pounds of ground beef. (insert picture of dehydrating beef). The process is quite simple you cook the beef thoroughly, strain off the fat (I know this isn’t very ketogenic but in order dry properly and keep it from spoiling it must be done) and pat it dry with a paper towel. Then spread it out on the dehydrator. We found that after a few hours it helps to move it around to ensure if fully dries out. It’s amazing how small a pound of ground beef becomes

Next time we will try dehydrating chicken. This time we settled for some chicken pouches that we took with us on shorter trips.


Picture

Veggies:
For vegetables we didn’t have the time or energy to dehydrate ourselves this trip so settled for buying dehydrated broccoli, spinach, onion and celery. We made individual pouches combining these and used them with every dinner. In the end we didn’t like the celery. It never rehydrated well and was quite chewy so I would leave that one out.


For multiday backpacking we used pouches of spices that we assembled at home. My favorite was a curry we put together. For days that we weren’t hiking far we used premade sauce mixes.

Fat:
We brought two small jars of coconut oil to add to our meals. We also had some packets of almond butter to add to our curry dinner as well as powdered coconut milk. We bought a few unripe avocados and managed to keep them safe and added them to a few of our dinners as well.
 
Putting it all together:
The dehydrated beef worked out surprisingly well. We did discover that it works best if you add the beef to a bowl with a few cups of water and let it sit covered for at least 30 minutes before starting to cook. Once the dehydrated beef was pretty well rehydrated we used our camping stove to heat the beef, add more water if needed and added the spices/flavor pouch and vegetables. Cook until everything is rehydrated.

We ended our day with a square of Choc Zero chocolate

Tips:
We didn’t factor in how much sweating we would do and how much extra sodium we would require. We did bring along electrolyte packets to take once per day but a few days in I was starting to get lightheaded and realized I needed more salt. We make a quick stop and picked up some more salt before continuing on our way. A low carb diet often increases your salt requirements so if you will be sweating a lot in addition make sure you bring extra salt!
 
If you have any camping food tips please comment below. We are always looking for new ideas.it.
Picture
  • Dr.Sara Jean Barrett is Co-Founder of Wellness Minneapolis and a naturopathic doctor who treats patients of all ages with a variety of health concerns. Her passion for her practice is demonstrated in the strong relationships she builds with her patients. It’s those relationships that allow her to more deeply identify underlying causes of health issues and provide patients with personalized, natural health care options. Learn more about Dr. Barrett by visiting her professional website.

0 Comments
<<Previous

    Recipes

    Every time you eat is an opportunity to nourish your body. Find our recipes on Pinterest!

    Get recipes delivered to your inbox monthly! Sign up for our newsletter.
    Sign up

    Recipe Box

    All
    Breakfast
    Dairy Free
    Drinks
    Fall
    Gluten Free
    Main Course
    Side Dish
    Spring
    Summer
    Treats
    Vegetables
    Winter

    RSS Feed

4450 Nicollet Ave S.
Minneapolis, MN 55419

Free parking in lot accessed from 45th St
Phone: (612) 598-8627
Fax: (612) 284-7910 
Reception hours: 9AM-5PM Mon-Fri
Sessions during COVID available by appointment only. No walk-ins.
Follow Us
Find us on Instagram @wellnessmpls
Contact Us • Practitioners • Newsletter Signup
Thank you to Emma Freeman for many of the photos on this site and on the walls at our location.
© Wellness Minneapolis | All rights reserved